-40%
NEW! Trampoline Mat Home Repair Kit 8x8 - 2 Quality Repair Patch for Holes Tear
$ 8.97
- Description
- Size Guide
Description
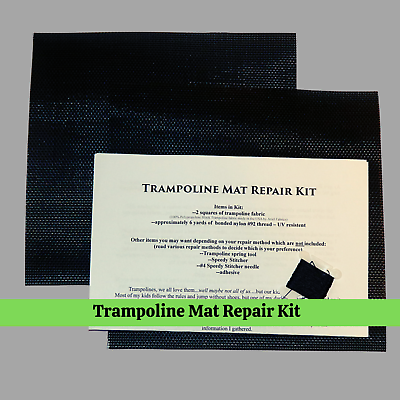
Trampoline Mat Repair KitItems in Kit:
--2 squares of trampoline fabric 8”x8”
(100% Polypropylene Black Trampoline fabric made in the USA by Ariel Fabrics)
--approximately 6 yards of bonded nylon #92 thread – UV resistent
_________________________________________________________________________________________________
Other items you may want depending on your repair method which are
not
included:
(read various repair methods to decide which is your preference)
–
-heavy hand sewing needle
--Trampoline spring tool
--Speedy Stitcher
--#4 Speedy Stitcher needle
--adhesive
Trampolines, we all love them...
well maybe not all of us.
...but our kids certainly love them. Most of my kids follow the rules and jump without shoes, but one of my darlings...well he jumped on it one freezing winter day with boots..the kind with hard plastic (sharp) soles. Bless his destructive self, he put a hole in our trampoline mat. We've only had it a year and when I saw it, I immediately envisioned my 7 kids taking a tumble through the mat. I know the hole was only 1” but I immediately banned all jumping until I could find a solution and fix that mat. Below is a summary of the information I gathered.
Happy Jumping!
Mat Repair: Before you decide to repair your mat, examine the tear. Most sources suggest that tears bigger than 3.5” should not be repaired but should have the mat replaced. Additionally, if your mat has dry rot (from sun exposure) a new patch may not fix the problem as the existing fabric is weak and prone to tearing.
In my research, I found there were 2 methods for doing this.
Method #1: PROFESSIONAL Fix It the “Right” way.
For this, method, you will need a spring tool (or brute force) to remove your mat from its frame. Take the mat along with your trampoline fabric patches to a canvas repair shop with an industrial sewing machine. They will sew the new patch in place. This is a high quality repair that will provide the most solid result. (Incidentally, I did try sewing this fabric with my regular sewing machine and it did not work.)
Method #2: I'm not Taking Off that DARN Mat **
When I saw the tear on our mat and started researching, my heart dropped. Putting the mat on our trampoline took forever and the thought of taking it off made me shudder. Not to mention, money was tight and I didn't have a spare 0+ tucked away for this expense. So, I decided to figure out how to fix it with the mat on without removing it by hand sewing it. I would suggest cutting your patch with a heat knife which melts and cuts the fabric at the same time or folding it under as the edges will fray. (A match/lighter will work to melt cut edges of the patch but its less precise) Another option is to hot glue the edges to prevent fraying.
This sewing job is easiest with 2 people. One person to lay on the dirty/muddy ground under the trampoline (a'hem...my dear husband did this...such a gentleman) and one person on top of the mat.
Option 1:Hand Sewing with An Embroidery Needle**
Using the included thread and a heavy duty needle (not included) stitch one patch to the top and one to the bottom of the mat. You may want to glue/tape this in place before starting to prevent the fabric from shifting. I would suggest going around your patch twice...once with a straight stitch and once with a zig zag pattern which will prevent the patch from fraying and hold its edges down tightly. If you don't have experience with hand sewing, I suggest you practice a bit before attempting this as it may be difficult to get even and strong stitches without a little knowledge.
Option 2: Speedy Stitcher **
(the method we used)
If you desire the look of professional stitching (and the strength) but don't want to remove the mat, you can use a Speedy Stitcher Hand Awl (not included) to sew your patch to the trampoline. You will use two patches...one for the top and one for the bottom. You may want to glue/tape these in place before starting to keep them from shifting while you sew. The Speedy Stitcher comes with a natural colored waxed poly thread but you may prefer the darker thread. If so, you can rethread the spool on the stitcher with the dark thread that is included. Note: The Speedy Stitcher kits comes with 2 needles (#8 straight and #8 curved) but you need a #4 straight needle (purchased separately) to sew the fine black thread. We found that the larger needles made holes that were too big in the trampoline mat. When you stitch your patch in place, I suggest going around it twice with the stitcher. The first can be a straight stitch and the second could be a zigzag to keep the edges from fraying or hold them down securely. There are many YouTube videos that show how to use a Speedy Stitcher. Its not too difficult and makes a quality stitch comparable to a machine.
**Disclaimer: We are not trampoline professionals. The proper method of having a trampoline repaired is to take it to a Canvas shop or use a commercial sewing machine. Hand sewing methods are not recommended but are shared out of our own experience and are done at your own risk. We accept no liability for any injury or harm occuring during or because of a home trampoline repair.


